Fixturing for Robotic Welding
While robotic welding can vastly improve productivity over semiautomatic welding, the level of efficiency of automation depends upon the thoughtful design of the fixturing for maximum productivity. Robotic welding is economical when properly applied, but it can be terribly inefficient and cost-prohibitive when simple fixture design considerations are overlooked. Many productivity gains are realized, or lost, at the design stage and while parts fixturing performs a role that is simple, good fixture design is critical to the success of a robotic welding system.

When beginning a new project for robotic arc welding, consider these fixture design objectives:
- Choose Your Fixture Material Wisely
- Optimize the Welding Circuit
- Orient the Fixture to Maximize Deposition Rates
- Strive for Accessibility, Repeatability, Simplicity, and Dependability
- Consider Alternatives when Fixture Design Costs are Prohibitive
Choose Your Fixture Material Wisely

For the purposes of this discussion, the reference to fixturing is specific to the custom designed device used to locate or support the work piece during the welding operation. Often used as interchangeable terms, 'tooling' is usually reserved for a specific device designed to form, compress, or shape.
One of the first steps in designing a robotic welding fixture is to choose the fixture base-metal. Factors include initial cost, long-term maintenance costs, and special characteristics particularly suited to the robotic welding application, such ad the critical aspect of maintaining accuracy and part repeatability in an environment exposed to elevated heat and weld spatter.
Common material options include mild steel, high-carbon tool steel, aluminum, stainless steel, and copper. Various alloys of the common base materials are available to improve work hardening, and wear resistance properties. Each material has different characteristics that can impact productivity and quality.
Initial cost considerations promote the use of square / rectangular structural steel tubing for a majority of the framework of the fixture. From a wear resistance standpoint, fixture hard stops and locating points are often made of alloyed high-carbon tool steel in an effort to resist deformation. Another commonly sourced wear resistant alloy, aluminum-bronze, work hardens and is not as prone to residual magnetism when compared to tool steel.
Pure copper is generally avoided when the consideration is hardness, yet it is the best all-around material for electrical conductivity. Electrical conductivity is critical for arc welding stability, a desirable aspect that is necessary to achieve maximum travel speeds. For this reason, alloys of copper and zinc (brass), or copper and tungsten carbide may be sourced to improve the wear resistance of copper. Novice fixture-builders sometimes overlook the electrical conductivity aspect and paint all surfaces, including the bolted work cable connection surface, which is the source of immediate start-up troubleshooting problems.


The thermal conductivity properties of aluminum and copper are high, referring to the ability of each of these materials to conduct heat. For these reasons, these materials are often used as heat sinks to conduct heat away from the work piece and 'spread' the heat over a larger surface area to minimize work piece distortion. In a robotic welding system, thermal expansion properties should also be considered. Thermal expansion refers to the fractional change in length of a material for a unit of change in temperature. Aluminum has the capacity to significantly change in length and volume when heated. For this reason, copper is more commonly used for heat sinks, and aluminum is typically avoided in an effort to strive for part repeatability. Work piece sub-assemblies can also be physically arranged and programmed with advanced welding processes, designed for low heat-input, to minimize welding distortion tendencies.
Optimize the Welding Circuit
Refined welding waveforms require an optimized welding circuit to maintain short arc lengths while reducing spatter, stubbing, arc-flare, and arc outages, all in an effort to maximize travel speeds.
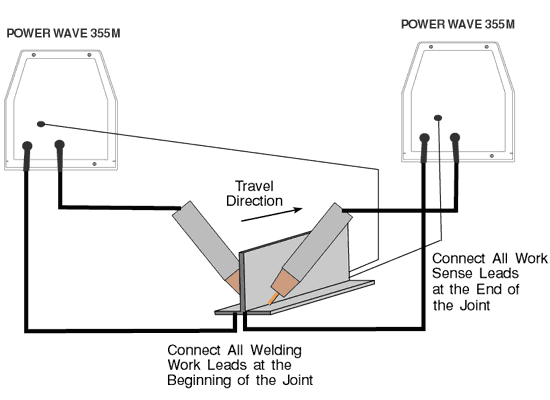

Special care must be taken to identify the optimum location of the work lead on the robotic welding fixture. As a general rule, it is desirable to locate the work cable and sense lead (if applicable), as close to the welding arc as possible, rather than indirectly through a series of bolted connections. In the optimum scenario, connection directly to the work piece is preferred.
Connection provisions on the fixture to insure that the work cable and sense lead are separated from each other, and from any robotic or welding communication cables insure the best results. When more than one power source is welding simultaneously on a single part, each power source requires a work lead from the work stud to the work piece. Avoid combining all of the work leads into one lead to reduce the arc interference and induced magnetism, otherwise known as arc blow.
At this point, also consider the anticipated welding travel directions, with the preference to move in the direction away from the work lead, as shown. Connect all of the work sense leads from each power source to the work piece at the opposite end.
Orient the Fixture to Maximize Deposition Rates

Next, examine how your fixtures position the work relative to a vertical orientation to take advantage of the force of gravity. When welding a part in the flat position, gravity is an ally. The finished welds are flat, uniform, and more easily made with higher deposition rates, that directly increase travel speeds and productivity.
When sheet metal applications are designed with lap or 'T' joints, simple positioning of the part to allow a 15-degree downhill torch motion can result in travel speed increases of 10 - 25 percent, by using gravity as an ally and the fast-follow characteristics of many consumable / gas combinations.
Welding overhead may be appealing to reduce or eliminate weld spatter from sticking to the part, however, the spatter will inevitably stick to the exposed surface of the fixture and tooling, requiring long-term maintenance attention. Welding overhead also requires overcoming the force of gravity. Deposition rates are lower and it is more difficult to maintain proper weld contours.
Strive for Accessibility, Repeatability, Simplicity and Dependability
There are many clamping / locating options to choose from when you approach a fixture at the design stage. The least complex involves simple manual clamping such as swing, push, or plunger clamps applied to a fixed or stationary table and are typically applied for short-run or prototype parts. In an R&D or short-run setting, these are very simple, low-cost methods to locate a part. The labor intensive nature of manual clamping is overcome by flexibility and versatility in these settings. Modular fixturing is a secondary option that provides benefits of flexibility while maintaining dimensional control.

On the other end of the spectrum, the more complex applications might involve a dedicated fixture. These fixture installations are more complicated with higher initial costs, and frequently involve the installation and routing of wiring, and pneumatic or hydraulic lines. Advantages of automatic clamping include the reduction or elimination of labor involvement for actuation, part proximity sensing, and sequenced clamping.
Another fixture design alternative involves retrofitting or repurposing an existing semiautomatic fixture, but this alternative must be approached with caution. In a semi-automatic application, the operator often makes adjustments, on-the-fly, to accommodate variation in joint location and geometry. When a robot is applied to the same fixture, any part movement dooms the assembly to the reject bin. If the fixture is predominantly dedicated to fillet and lap welds, the fixture can normally be reused, however outside corner welds and square butt joints often require serious enhancements to the existing fixture to maintain repeatability.

In each of these options, a variety of additional objectives must be considered. For example, the fixture should be designed to operate at an ergonomic height and reach and without the need for operator force during loading and unloading. Sufficient torch accessibility and visual clearance, supplemented by adequate lighting, should be an emphasis. Fixture surfaces are ideally designed to minimize flat surfaces to avoid the collection of welding spatter from interfering with critical locating surfaces or actuating components.
The objective of the integration of the fixture and clamping / locating device is to insure that the weld joint location repeats, in a 3-dimensional space relative to the system, within +/- half the diameter of the applied welding wire. For example, using 0.045" diameter wire allows a tolerance of +/- 0.022".
Gap location and width must be consistent from part to part, with the same tolerances as the weld joint location. Beyond plus or minus half the diameter of the wire thickness, the weld size may be required to be increased to offset the smaller weld throat that results. A larger weld may require 125 - 200% more weld metal than required if proper fit-up is maintained.
Obtaining good fit-up is critical to controlling costs. In order to obtain a good fit-up consistently, emphasis must also be placed on preconditioning operations such as cutting / shearing, machining, heat treating, and bending / forming processes.

Consider Alternatives when Fixture Design Costs are Prohibitive
There are times when it is too expensive to manufacture parts to tight tolerances, or impractical to present a large fabrication to a robot fixture, within thousandths of an inch. Small part runs may also prohibit the application of some fixturing options. In these cases, low-cost software sensory technology such as Touch Sensing or Through-The-Arc Seam Tracking can be employed to overcome deficiencies in a part or fixture.


In the application of Touch Sensing, the robot is programmed to touch the welding wire to a number of locations on the fabrication to identify the part location and orientation. With this information a master program can be 3-dimensionally shifted to match-up with the new part orientation. Through-the-Arc Seam Tracking is another option that can be enabled once the robot begins welding - the robot weaves across the weld joint and modifies its path based on any joint location shift, perhaps due to distortion or part spring-back, for example. Other complex sensing and tracking methods include laser-based vision systems.

Summary
Robotic welding is economical when properly applied, but it can be terribly inefficient and cost-prohibitive when simple fixture design considerations are overlooked. Many productivity gains are realized, or lost, at the design stage and while parts fixturing performs a role that is simple, it is critical to the success of a system. Consider basic fixture design objectives to improve the productivity of your robotic welding system.