Heavy Duty Mower Trailer
From Arc Welded Projects, Volume IV
The James F. Lincoln Arc Welding Foundation
This welding project was prepared by Eric Hardel of Monroe High School (Dan Saunders, Instructor) in Monroe, WI as an entry in the James F. Lincoln Arc Welding Foundation Award Program.
A 5 x 8 utility trailer can haul about everything an ambitious homeowner needs. Whether it is lawnmowers with the attached ramp tailgate or drywall for a new addition, this trailer can handle it all. The trailer is equipped with the appropriate reflective stickers, taillights and marker lights and with legal safety chains.
First, cut the frame and tongue. Weld the frame together, checking constantly for square. After the frame is together, make the tongue and attach it, welding at all the seams.
Next address the axle, which in the case of this project was purchased from a local custom trailer shop. Weld the axle onto the frame slightly toward the rear to give the co
rrect tongue weight. With the axle on the frame, flip the frame over to start work on the sides.
The sides are a project in themselves. Trying to keep them level and square is not easy, but it can be done. Start with the light posts and then put on the front corners. With these on, put the top angle iron on and put in the middle supports accordingly. Repeat this step on the other side and front.
With the sides completed, attach the pre-fabricated fenders. (The fenders came from the same place as the axle.) For the fenders, get the correct spacing around the tire and weld them onto the frame.
With the fenders on, cover the side with expanded metal. The metal comes in 4 x 8 sheets, so use a plasma cutter to cut it to fit. Then spot weld the metal to the frame. One caution: this metal is the hardest thing to weld - since it is so thin, it is very easy to burn through.
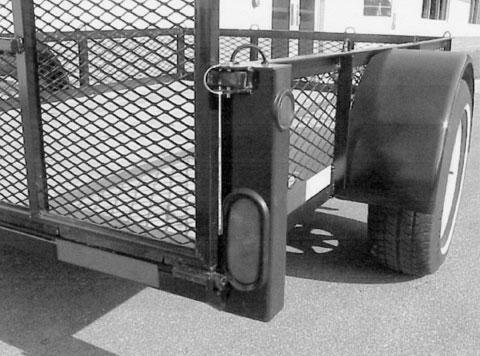
With the side now covered, move on to build the tailgates. The ramp is a simple rectangle with some support in the middle, covered with raised expanded metal to provide grip. The smaller tailgate is a bit more difficult to fabricate since it has to line up with the top of the sides. It requires some patience and a good tape measure.
With the tailgates built, the trailer is ready to go to the paint shop. (Since my father works for an auto body shop, the trailer was sand blasted and painted in one day and done very well.) After the paint dries, take the trailer back to the shop to add the 2 x 12 treated wood floor and the wiring for the tail lights. (The taillights were purchased from the same shop as the axle and the fenders.) Run the wire from the tongue to the back, then split and run it to the tail lights and marker lights. With the lights finished, and reflective stickers attached, the trailer is road ready.

|
Bill of Materials |
|
|
Quantity |
Description |
| 2 | 1/2" x 3" x 4" Angle - side frame members |
| 1 | 1/4" x 3" x 4" Angle - front frame member |
| 1 | 3/16" wall x 2" Square tube - back frame |
| 3 | 3/16" x 2-1/2" Angle - bottom frame members |
| 1 | 3/16" x 2" x 3" Tube - tongue |
| 1 | 3/16" x 2" x 3" Tube - tongue piece |
| 1 | 1/4" x 1-1/2" x 7" Flat bar - tongue cap |
| 1 | 1/4" x 1-1/2" x 3-1/2" Flat bar - tongue cap |
| 1 | 14 gauge x 1" x 5'6" Square tube - wiring protection |
| 2 | 1/8" x 3" x 4" light posts |
| 2 | 3/16" x 2" x 8" Angle - top side rails |
| 1 | 3/16" x 2" x 6' Angle - front rails |
| 8 | 3/16" x 1-1/2" x 15-1/2" Angle - side vertical supports |
| 1 | 14 gauge x 1" x 70-1/2" Square tube - top tailgate |
| 4 | 14 gauge x 1" x 14" Square tube - tailgate verticals |
| 1 | 3/4" schedule 40 Pipe - 70-1/2" - bottom tailgate |
| 1 | 10 gauge x 1-1/2" x 67" expanded metal - tailgate |
| 1 | 10 gauge x 1-1/2" x 14" x 68" ex. metal - front trailer |
| 2 | 10 gauge x 1-1/2" x 15" x 96" ex. metal - side trailer |
| 5 | 14 gauge x 1-1/4" Sq. tube x 48" - ramp gate |
| 1 | 14 gauge x 1-1/2" Sq. tube x 68" - ramp gate |
| 1 | 3/4" schedule 40 Pipe x 68" - ramp gate |
| 1 | 3/4" x 10 gauge x 48" x 68" Raised ex. metal - ramp |
| 2 | 11" x 32" fenders |
| 1 | 2000# Torsion axle - 0 degree |
| 2 | Trailer tires and rims |
| 1 | 2" Coupler |
| 1 | 2K Top wind jack |
| 1 | Package of torx deck screws |
| 2 | Red clearance lights |
| 2 | Oval tail/turn lights |
| 1 | Set of safety chains |
| 1 | Flat four trailer connector |
| 1 | 6' - reflective tape |
| 1 | 17' 4 - wire |
| 1 | 6' 3 - wire |
| 16 | Heat shrink wire connectors |
| 6 | Red oxide primer |
| 6 | Satin black truck bed liner protector |
| 6 | Gloss black spray paint |
| 6 | 2' x 12" Treated boards |
SAFETY FIRST
Ventilation
It is important to use enough ventilation to keep the fumes and gases from your breathing zone. For occasional welding in a large room with good cross-ventilation, natural ventilation may be adequate if you keep your head out of the welding fumes. However, be aware that strong drafts directed at the welding arc may blow away the shielding gas and affect the quality of your weld. In planning your workshop ventilation, it is preferable to use ventilation that pulls fume from the work area rather than blows necessary shielding gas away.
Electric Shock
Remember, electric shock can kill. Wear dry, hole-free leather gloves when you weld. Never touch the electrode or work with bare hands when the welder is on. Be sure you are properly insulated from live electrical parts, such as the electrode and the welding table when the work clamp is attached. Be sure you and your work area stay dry; never weld when you or your clothing is wet. Be sure your welding equipment is turned off when not in use. Note that Lincoln wire feed / welders have a relatively low open circuit voltage and include an internal contactor that keeps the welding electrode electrically 'cold' until the gun trigger is pressed. These important safety features reduce your risk of electric shock during any welding project.
Arc Rays
It is essential that your eyes are protected from the welding arc. Infrared radiation has been known to cause retinal burning. Even brief unprotected exposure can cause eye burn known as 'welder's flash'. Normally, welder's flash is temporary, but it can cause extreme discomfort. Prolonged exposure can lead to permanent injury.
Workspace - Protection from Sparks
Before you get started on any welding project, it is important that you make sure your work area is free of trash, sawdust, paint, aerosol cans and any other flammable materials. A minimum five-foot radius around the arc, free of flammable liquids or other materials, is recommended. Extra care should be taken in workshops that are primarily used for woodworking as sawdust can collect inside machines and in other hard to clean spaces. If a spark finds its way into one of these sawdust crannies, the results could be disastrous. If your shop area is too small to allow for a safe radius, please use an alternate area like a garage or driveway.
Gas Cylinders
Cylinders can explode if damaged. Always keep your shielding gas cylinder upright and secured. Never allow the welding electrode to touch the cylinder.
SAFETY EQUIPMENT
It is also imperative to make sure you have all the necessary safety equipment and that you're wearing welding friendly clothes. You should wear:
- Welding gloves - dry and in good condition
- Safety glasses with side shields
- Protective welding shield with a dark lens shade appropriate for the type of welding you do
- Head protection - like a fire retardant cotton or leather cap
- Long-sleeve cotton shirt
- Long cotton pants
- Leather work boots
A fire extinguisher should also be on hand during any welding. Also, make certain no children are in the area when you are welding. They may watch the arc and can experience retinal damage from its intense light. There is also a risk of a child getting burned by welding spatter.
Finally, see the instruction manual for your welder for added safety information.
*This project was published in Arc Welded Projects, Volume IV by the James F. Lincoln Arc Welding Foundation. The material has been edited and some of the drawings improved, but neither the projects nor drawings and instructions have been reviewed for accuracy or safety.
*This project was included because it appeared to be interesting, and in some respects, proposed novel applications. However, since the James F. Lincoln Arc Welding Foundation or the Lincoln Electric Company have not tested the material, nor verified the computations or other aspects described, the Foundation or Lincoln Electric cannot, and does not, assume responsibility for the accuracy of the plans or safety of the project. The project was submitted for such use as may appear feasible, but those making the project must assume full responsibility for the results of their efforts to make or use the project described.